What’s the solution if my client connected to the Range Extender has no Internet?
If you’ve configured the range extender step by step and LED lights are on but there is no internet or your extender is working but the connection is unstable, please try the following troubleshooting.
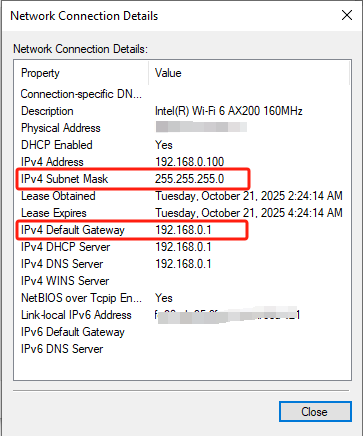
Step 1 check the IP information of your network.
Note: If you don’t know how to login to your router’s management page to check IP info, please refer to Method 1. Otherwise, please refer to Method 2.
Method 1
Connect a computer to your main router with Ethernet cable or Wi-Fi, then check the IP info of your computer. If you don’t know how to check the IP address on a computer, please refer to How to find IP address of your client device?.
Method 2
Log in to the management page of your main router and check the IP or DHCP configuration info on the router’s management page.
Here we take MERCUSYS MR80X as an example, you can go to Advanced > Network > LAN to get the IP address and subnet mask of your router.
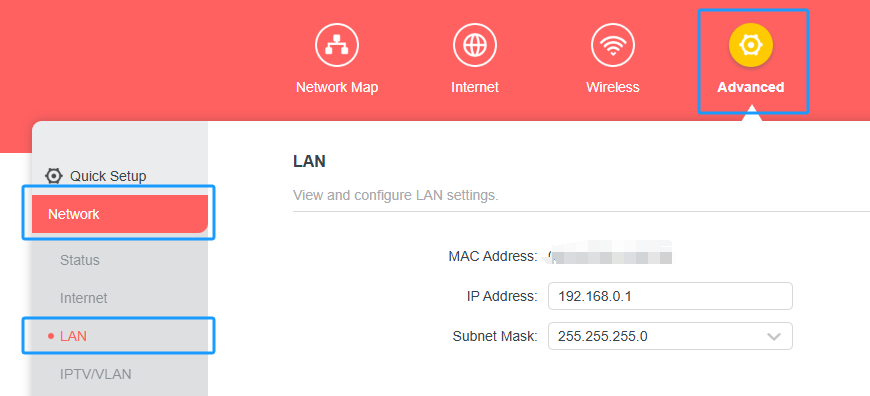
Note: If your router is not MERCUSYS, please ask for help with your router’s support.
Step 2 Configure the network settings on the extender.
First, please configure the range extender in a normal way.
Then log in to the management page of your extender, go to Settings > Network and configure the network info on extender’s web management page.
For web login, please refer to How to login to the web management page of the Mercusys Range Extender?.
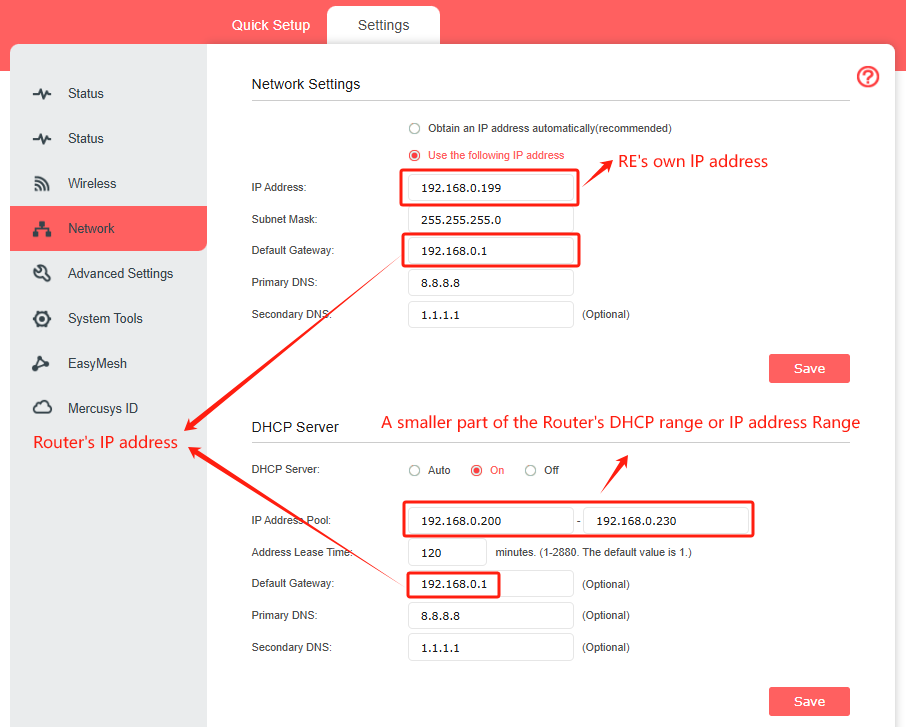
Block 1: Network Settings
Choose the “Use the following IP address”.
IP Address: The extender’s own IP address. This is in the same subnet as router’s IP.
Fill with the IP 192.168.0.199.
Subnet Mask: This subnet mask need to check on the main router or other device connected to main router (normally, the subnet mask is 255.255.255.0)
Fill with the subnet mask info: 255.255.255.0
Default Gateway: The gateway is usually the router’s LAN IP.
Fill with the router’s LAN IP: 192.168.0.1
Primary DNS and Second DNS: The DNS server for the client.
Fill with 8.8.8.8 (primary DNS) and 1.1.1.1 (secondary DNS).
Block 2: DHCP Server
Enable the DHCP server.
IP Address Pool: This is the range of the clients’ IP, normally we can check on the router’s management page. (a small range of the router’s DHCP pool)
Fill with the IP address pool (extender): 192.168.0.200-192.168.0.230 (Smaller than the router’s DHCP pool)
Address Lease time: the IP that the client got can be used for xxx minutes. (set 1440 in this case)
Fill with the number: 1440 (minutes)
Default Gateway: Fill with the router’s LAN IP: 192.168.0.1.
Primary DNS and Second DNS
Fill with 8.8.8.8 (primary DNS) and 1.1.1.1 (secondary DNS).
If it still cannot fix the problem, please contact MERCUSYS Technical Support for further help.